A "Minecrafty" Voxel Renderer with a Different Vibe
My nephew calls anything pixelated or blocky “minecrafty.” This sparked an idea: could I build a tiny, “minecrafty” voxel renderer, but with lighting and mood that felt a bit different? This post walks through that experiment: what a voxel is in this context, how rays traverse the grid, and how simple lighting and fog can create a distinct look.
What This Renderer Does
This isn't a game engine, but a simple renderer with a few core features:
- Voxels, not triangles: The world is a fixed 3D grid where each cell is either empty or holds a solid color.
- Simple, moody lighting: The scene is lit with ambient and directional Lambertian light, plus optional exponential fog to add depth.
- Ray-traced rendering: It casts one ray per pixel from a pinhole camera to see what it hits in the grid.
- Fast grid traversal: It uses the 3D DDA algorithm to step efficiently from one voxel to the next along a ray's path.
Voxel Data and Shape Rasterization
The world is stored in an in-memory VoxelGrid. To place objects, I "rasterize" procedural shapes into this grid. This process checks the center of each voxel against the shape's boundaries. If the center is inside the shape, the voxel is filled with the shape's color.
pub fn rasterize_shape(grid: &mut VoxelGrid, shape: &dyn Shape) {
    let dims = grid.dims();
    for z in 0..dims.nz {
        for y in 0..dims.ny {
            for x in 0..dims.nx {
                // Check if the center of the voxel is inside the shape
                let voxel_center = Vec3::new(x as f32 + 0.5, y as f32 + 0.5, z as f32 + 0.5);
                if let Some(c) = shape.color_at(voxel_center) {
                    grid.set(x, y, z, c);
                }
            }
        }
    }
}
Shapes are defined by a simple trait that answers the question, "What color is at this specific point?" For a sphere, it looks like this:
pub struct Sphere {
    pub center: Vec3,
    pub radius: f32,
    pub color: Color,
}

impl Shape for Sphere {
    fn color_at(&self, p: Vec3) -> Option<Color> {
        // Is the point p inside the sphere?
        if (p - self.center).length_squared() <= self.radius * self.radius {
            Some(self.color)
        } else {
            None
        }
    }
}
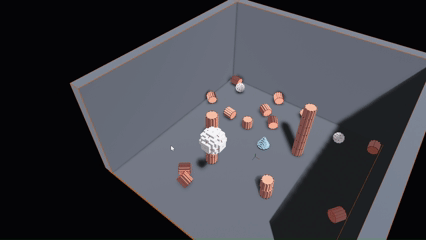
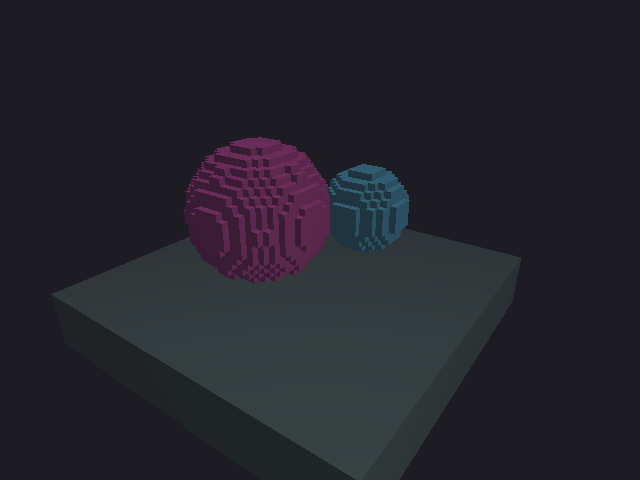
This voxelization step is the foundation of the blocky aesthetic. Even mathematically smooth shapes like spheres are converted into a collection of axis-aligned cubes.
Camera and Primary Rays
The camera generates a primary ray for each pixel on the screen. Using the field of view (FOV) and camera orientation, it calculates the direction of a ray originating from the camera's position and passing through the center of that pixel.
pub fn primary_ray_for_pixel(&self, px: u32, py: u32, width: u32, height: u32) -> (Vec3, Vec3) {
    // Convert pixel coordinates to Normalized Device Coordinates (-1 to +1)
    let ndc = Vec2::new(
        (px as f32 + 0.5) / (width as f32) * 2.0 - 1.0,
        1.0 - (py as f32 + 0.5) / (height as f32) * 2.0, // Flipped Y
    );

    // Calculate the ray direction in camera space
    let tan_half_fov = (0.5 * self.vertical_fov_radians).tan();
    let dir_camera = Vec3::new(
        ndc.x * self.aspect_ratio * tan_half_fov,
        ndc.y * tan_half_fov,
        -1.0,
    ).normalize();

    // Transform the direction into world space
    let dir_world = self.orientation * dir_camera;
    (self.position, dir_world)
}
3D DDA: Walking the Grid
To find out what a ray "sees," we need to find the first filled voxel it intersects. The most efficient way to do this is with a 3D Digital Differential Analyzer (DDA) algorithm. DDA is an incremental algorithm that's perfect for this task because it leverages the grid's uniform structure to quickly calculate the next voxel boundary a ray will cross.
First, we determine where the ray enters the grid's bounding box.
// Find the ray's entry and exit points with the grid's AABB
let (t_enter, t_exit) = if let Some(hit) = grid_bounds.intersect(origin, dir) {
    (hit.t_min, hit.t_max)
} else {
    return None; // Ray misses the grid entirely
};
Next, we initialize the DDA and step through the grid one voxel at a time until we find a filled cell or exit the grid.
// Stepping logic inside the DDA loop
while is_within_grid_bounds(vx, vy, vz) {
    // 1. Check if the current voxel is filled
    if let Some(color) = grid.get(vx, vy, vz) {
        // Found a hit! Return color, distance, and normal.
        return Some(Hit { ... });
    }

    // 2. Advance to the next voxel boundary
    if t_max_x < t_max_y {
        if t_max_x < t_max_z {
            vx += step_x;
            t_max_x += t_delta_x;
            last_axis = Axis::X;
        } else {
            vz += step_z;
            t_max_z += t_delta_z;
            last_axis = Axis::Z;
        }
    } else { // ... similar logic for Y and Z axes
        // ...
    }
}
When a filled voxel is found, we know which face the ray entered from (last_axis). This gives us an axis-aligned normal vector, which is essential for both shading and reinforcing the blocky style.
Shading: Ambient + Directional + Fog
Once we have a hit color and a surface normal, the shading is straightforward. The final color is a combination of three components:
- Ambient: A small, constant light to ensure even dark areas are not pure black.
- Directional (Lambertian): Simulates a distant light source (like the sun). The brightness depends on the angle between the surface normal and the light direction.
- Fog: An exponential fog effect that blends the object's color with the background color based on its distance from the camera. This adds a great sense of depth and atmosphere.
let out_color = if let Some(hit) = trace_voxels(...) {
    let base_color = hit.color;
    let normal = hit.normal;

    // Lambertian diffuse lighting
    let lambert = 0.0_f32.max(normal.dot(-light_dir));
    let diffuse_lighting = base_color * light_color * lambert;

    // Add ambient term
    let mut final_rgb = base_color * settings.ambient + diffuse_lighting;

    // Apply optional fog
    if settings.fog_density > 0.0 {
        let fog_factor = 1.0 - (-settings.fog_density * hit.distance).exp();
        final_rgb = lerp(final_rgb, background_color, fog_factor);
    }

    final_rgb
} else {
    background_color
};
This simple combination is where the "different look" comes from. By using a soft ambient term, a warm directional light, and a touch of fog, the blocky world feels less like a game and more like a miniature, moody diorama.
Performance Notes
- Coherent Traversal: DDA is fast because it only touches the voxels that lie directly on the ray's path.
- Parallel Rendering: The renderer uses the Rayon crate to render rows of pixels in parallel, taking full advantage of modern multi-core CPUs.
Embracing the Limitations
This renderer has intentional constraints that define its aesthetic:
- Voxels are always axis-aligned. You can't have "angled" blocks. Rotating a shape simply changes which voxels in the grid are filled.
- Normals are always axis-aligned. This is a direct result of the grid-based traversal and is key to the clean, blocky lighting response.
These aren't bugs; they're design choices that keep the code simple and the visual style consistent.
Closing Thoughts
What started as a fun reaction to my nephew's "everything blocky is Minecraft" comment became a wonderful exploration of a simple aesthetic. I leaned into the blockiness but used lighting to aim for something cozier and more atmospheric. The codebase is tiny and easy to modify, making it a great playground for new ideas.
I wonder what it would look like to turn these voxel graphics into 3d meshes bouncing around in a physics engine?